The Underrated Benefits of Day Camps: 5 Reasons to Enjoy Easy Adventures
As great as big missions into the bush & backcountry are – sometimes all you’re looking for is a quick break from the everyday grind. A small taste of the wilderness to unwind before heading back to civilisation.
Unlike multi-day trips, day camps don’t require a whole lot of prep, planning, time, or overall effort, and they can serve as a great inbetween when time is short.
What we’re talking about here is different to just a day tramp or local bush walk.
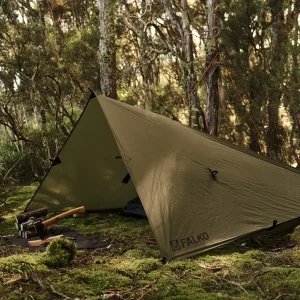
What we mean when we say ‘day camp’ is packing the essential gear, heading out nice & early, and spending the day parked up next a mountain stream or grass clearing. Maybe you’ll pitch a tarp, start a small fire and brew a coffee, maybe you’ll practice some survival skills, maybe you’ll sink a few beers – no matter you do, the point is that you’re out there in nature.
We think day camps offer the perfect balance between immersion in nature without commiting to an overnight stay, allowing some real time to slow down & reconnect.
A big reason why we ourselves get outside is to find some time to think while enjoying the fresh air. At a guess, you probably do too – whether it be with a rifle, a rod, or a pair of boots; you’re probably out there at least partially seeking something (other than a deer or a fish).
To us here at Falko, day camps are an ideal way to disconnect for a while – without the extra hassle of all that other stuff. It’s an excuse to relax for a bit, and this is something we think a lot of people have forgotten how to do these days.
With all that said, here are our top reasons why day camps are an underrated gem in the world of outdoors and back-country adventures.

5 Reasons Why We Love Day Camps
1. Day camps are low stress, simple, and accessible.
It’s all about simplicity, which means less stress and more time to enjoy just being out there. There’s no need to pack days worth of food or gear into your pack – just pick a spot or trail, grab the basics, and you’re pretty much good to go. This ease also means a day camp is accessible to almost anyone. Have a few hours free on a Saturday? You can still shoot out for a quick escape. You’re not tied down by a set plan either. Once you get out there, you can change your plans, do what you want, and head home when you’re ready. It’s far less pressure and much more freedom compared to multi-day trips.
That’s kind of the point here. Not every adventure needs to be roughing it for days at a time in the deep bush, sometimes a more relaxed trip is needed in order to actually relax. Which brings us to the next point…
2. Reconnect, Relax, Reflect.
It doesn’t take long to feel the benefits of being out in nature, and day camps are a perfect way to recharge without the need for a big expedition. Just a few hours spent in the bush can help clear your mind and reset your worries, making it a mindful escape that’s both accessible and impactful.
Seriously, go sit by a river and switch off for a bit, these short breaks have a real, positive effect on your mental health. You don’t need weeks of planning or time off work to feel connected to the outdoors – a day camp gives you that feeling on your own terms, pretty much whenever you need it.

3. Minimal Gear Required.
The beauty of day camps is that you don’t need to lug around a mountain of gear to have a great time. With a lightweight setup, you’re free to explore with ease and truly enjoy your time outdoors. Our ultralight titanium gear and durable waxed canvas ground mats are perfect companions for this. Simple, efficient, and built to handle whatever the day throws your way. A compact kit means you spend less time setting up and more time soaking in the surroundings.
As a minimum, we’d recommend packing the following for any day trip:
- First aid kit
- Food & water
- Appropriate clothing for the conditions
- Head-torch
If you don’t have all the gear for an overnight stay, a day camp is still possible which is a massive bonus – especially if you’re just getting into the outdoors lifestyle.
4. Practice Before The Real Thing
Day camps are a low-stakes environment to put your gear to the test. If you’re trying out a new cooking setup, lightweight shelter system, or practicing fire-starting skills, it’s a chance to get familiar with everything before you commit to a longer, multi-day trip.
There’s no need to rush, you can spend all day honing essential bushcraft skills, like starting a fire with our FURNACE Ferro Rods or practicing outdoor cooking. Without the pressure and time constraints of an overnight stay, you can focus on refining your techniques and making sure your gear is dialled in for when the real adventure comes.

5. Make the Most of Good Weather
Day camps allow you to embrace those ideal weather windows without the worry of getting caught in a storm overnight. Unlike with multiday trips, tomorrow’s weather doesn’t matter – just take advantage of the clear skies now. With a day camp, you’re flexible. Got a sudden gap in the rain or a crisp afternoon? Seize it, get out there! The beauty of it all is that you can still get your fix of adventure, connect with the wilderness, and be home before the weather turns to crap.
Bonus Tip: Being out in the elements when the weather turns is a different experience when you’re not committed to staying out. Enjoy the rain, but be safe around rivers and streams.
Summary
Day camps offer a flexible, low-commitment way to escape into nature. You can adapt them based on whether you’re looking to unwind or sharpen your outdoor skills. And with minimal gear and maximum freedom, you can enjoy the outdoors without the stress of multi-day trips.
They’re perfect for seizing good weather windows, reconnecting with nature, and practicing new techniques before bigger adventures. Plus, the simplicity of a day camp means you can pack lighter, move faster, and still enjoy all the benefits of time spent outdoors without the hassle of overnighters.
Sure, the term “day camp” might sound a bit odd, and we’re not even sure thats the right term, but the idea’s simple: head out for a single-day chill mission in the wild to scratch that outdoor itch when between bigger trips. It’s that quick hit of nature that keeps you going until the next full-blown adventure. Sometimes, the best way to reconnect with the wild is to keep it simple, and day camps give you the freedom to do just that.
Ready to get equipped for good times outdoors? Check out the our range below to ensure you’re going prepared.

Ultralight Titanium Camp Plate
Original price was: $54.99.$49.99Current price is: $49.99.
Ultralight Camp Tarp (3m x 3m)
$249.00

Falko Casual T-Shirt
$49.99

Ultralight Titanium Chopsticks
Original price was: $29.99.$24.99Current price is: $24.99.
Pros and Cons of Titanium for Camp Plates
When it comes to selecting the right materials for your camp cooking gear, titanium stands out as a good choice. It has a few unique properties that make it a reliable and versatile option for any adventures. However, like any material, titanium has its advantages and disadvantages. Let’s dive into the pros and cons to help you decide if it’s the right fit for your next adventure.

Pros of Titanium for Camp Cooking
1. Travel lighter, venture further
One of the most significant benefits of titanium cookware is its incredibly light weight. For those who love to venture deep into the wilderness, every gram counts. Titanium gear, such as our HAAST Camp Plate, ensures you can carry your essentials without being weighed down, allowing you to cover more ground and explore further.
2. Durability
Titanium is renowned for its strength and resilience. Unlike some other materials that might bend or break under pressure, pound-for-pound, titanium stands up well to abuse. If you’re tackling rough terrain or dealing with harsh weather conditions, a good titanium camp plate won’t let you down. Plus, if it does bend or dent, it can be bent back into shape easily.
3. Easy to Clean
After a long day of hiking and exploring, the last thing you want is to struggle with cleaning your cookware. Titanium’s non-porous surface makes it easy to wipe down, ensuring you spend less time on cleanup and more time enjoying your surroundings. Seasoning your plate is also a great way to keep it easier to clean.
4. Versatile Cooking Options
Titanium’s versatility is another significant advantage. You can place it directly on coals or use it as a frying pan over a gas stove, making it an all-in-one solution for various cooking methods. This adaptability is perfect for outdoor cooking, where having multi-functional gear can simplify your setup and reduce the number of items you need to carry.
Cons of Titanium for Camp Cooking
1. Handling Hot Food
One of the big drawbacks of titanium is that it conducts heat very well. While this can be great for cooking, it means the bottom of your plate can become extremely hot when holding hot food, making it difficult to handle. If you eat off a table or rest the plate on your lap this is less of an issue, but if you’re into holding your plate while you eat, you’ll want to be careful.
2. Expense
Titanium cookware tends to be more expensive compared to other materials like aluminum or stainless steel. This higher cost can be a deterrent, especially those new to camping or on a tight budget. However, investing in a high-quality piece like the HAAST Camp Plate can be seen as a long-term investment due to its durability and longevity. If your primary concern is weight, then the price is easily justified.
Summary
Titanium cookware, such as the HAAST Camp Plate, offers a host of benefits for the avid camper. Its lightweight nature allows you to travel further and faster, while its durability ensures it can withstand the toughest conditions. The ease of cleaning and versatile cooking options further enhance its appeal, making it a valuable addition to any outdoor kit.
However, it’s important to be mindful of the heat conductivity and higher price point. While these factors might pose challenges, the overall advantages of titanium—particularly for those who prioritise weight and durability—make it a solid choice.
For those who’re ready to make the jump to titanium, the HAAST Camp Plate is a good option that promises to serve you well on countless adventures.
Ultralight Titanium Camp Plate
Original price was: $54.99.$49.99Current price is: $49.99.
How to Use a Ferro Rod: The New Zealand Specific Guide
Ferro rods require skill and knowledge to use effectively, but once you’ve got the basics under control they are a reliable, fun and effective way to establish fire in both recreational and emergency situations.
Regardless of temperature, altitude, and humidity, Ferro rods will reliably produce molten sparks, making them a great back-up tool in survival situations.
Down here in the forests of New Zealand, things are a little bit different. We can have high rainfall throughout the year and our forest floor is often damp and cold – making tough conditions for getting a fire started. Therefore we highly recommend practicing how to light a fire using a ferro rod before going bush.

How To Use A Ferro Rod:
Tools you will need:
- Ferro rod
- Knife, axe, or saw
- Ferro rod striker (optional)
Step 1. Collecting the Fuel
Preparation is everything. A spark from a ferro rod is near useless if you don’t have something ready to catch that spark and turn it into a flame, and that flame is useless without a larger fuel to transfer it to – that’s basic firemaking 101.
By far the easiest way to create that initial flame from a spark is to use a pre-made tinder ball or some kind of fire kit. These will typically accept a spark from a ferro rod and will hold the flame for a good amount of time, but those luxuries aren’t always available so it pays to learn how to start from zero.
Assuming you’re in the bush (and you’re not in a zone where open fire is prohibited), wood is going to be your main fuel.
Obviously the drier the wood the better, so look for dead standing trees or dead branches that are suspended off the ground. Sometimes a good bit of dry wood can be tough to find, so keep hunting around. If you’re near a stream you can sometimes find bits of driftwood that have been deposited onto the bank during the last flood, so check these areas too.
To get a starting fire bundle you’re only going to need fine twigs and sticks.
Aim for anything from the width of a piece of spaghetti up to the width of your wrist. Larger pieces can be broken down to the right size later. This can be necessary to access the dry center of the wood which will make the fire starting process much easier.
How much to collect is up to you. If you want to keep the fire small for cooking, you won’t need a whole lot.
If the fire is for cooking + warmth, and will be burning for several hours, you’ll need to collect a good amount of wood. With a bit of experience you’ll soon get a feel for how much you’ll need.
Pro tip: There is no such thing as too much tinder & kindling. Once you think you have enough, double it. If your fire dies before getting to the finger-width kindling stage it’s a real hassle to build it up again.

Step 2. Prepare the Wood
Seperate your wood into piles based on thickness. You need to step the fire up gradually from the tinder stage to the log stage
Your piles should look a little like this: tinder/shavings > spaghetti > pencil > finger > sausage > wrist.
It helps to have these piles organised and within reach of the fire.
Processing some of the larger branches into smaller sticks will help. The inside layers of a stick/branch tend to be drier which is required in the earlier stages of getting the fire going. Batoning with your knife allows the most control when processing wood down to this size.

As we mentioned earlier, ferro rods require some kind of material to catch the spark and turn it into a flame.
If there’s one thing to remember from this article, it’s this: extra fine wood scrapings will make your life easy. Set aside a small and dry piece of kindling that can be used to produce scrapings, and another that can be used to make a featherstick or two. We’ll cover this in the next step.
Pro tip: Proper organisation can make or break your fire. Ensuring that the fuel is collected and ready before you attempt to start your campfire will save you a lot of hassle.
Step 3. Catching the Spark: Wood Shavings and Feathersticks
The key trick with ferro rods is to catch the spark with a very fine flammable material. Take note of this, because it’s the #1 thing people get wrong when learning.
Here’s the options:
Wood Shavings
They’re easy to produce and can be relied upon to produce a flame, so when you’re using only the resources you’ll find in the bush, wood shavings are a good option. The easiest way to produce these shavings is scraping your knife blade at a 90° angle along the edge of a dry stick. Let the shavings fall down and collect in a nice pile on a dry and clean surface. We used a piece of bark to catch the scrapings in the example shown here.

Side tip: This is also where ‘fatwood’ comes in useful. If you don’t know what fatwood is, its essentially pine wood that has been naturally impregnated with pine resin, meaning it will catch and hold a flame easily. A quick google search will provide you with more information on this, but it’s easy to find and we recommend keeping a few chunks in your fire kit.
You can also use a nest of scruffed up dry grass (or similar fine material) instead. This is a quicker way to get a flame, but such material can be hard to find depending on the environment.
Once you have your pile of wood shavings, you can flick a few sparks from the ferro rod into the middle. If you’ve done it right, this should produce a small flame, but it can take a few strikes to get the pile to catch. Now you have a flame, you need to do something with it.
Feather Sticks
Once you’ve converted a spark into a naked flame using the wood shavings, you’ll need something to transfer it to. This is where the classic featherstick comes in. We won’t go into detail here about how to make a featherstick – there are plenty of detailed tutorials online, but the rough idea is to produce a collection of thin slices of wood that increase surface area and allow a larger, hotter flame.
Holding the feather stick over the flame will quickly ignite the thin slices. You can then easily transfer it to the pre-prepared stack of kindling.

Step 4. Tending to the Fire
From here the process is the same as any other campfire. Make sure you have your different sizes of firewood ready to go and carefully grow the fire until you have a good bed of coals. From here you can feed it as much or as little fuel as you require to cook or keep warm.

Summary
Ferro rods are an essential bit of gear for anybody who regularly ventures into the outdoors. They require a bit of skill and knowledge to use effectively, but as outdoorsmen we’re not afraid of a bit of a challenge. You simply can’t beat the reliability and longevity that a quality ferro rod provides, and one you’ve mastered the craft, you’ll find any excuse to bust one out and get that fire roaring!
We’ve done the hard-yards in testing and comparing different ferro rods so you don’t have to. Shop Falko ferro rods here and establish your next camp with full confidence.


Ferro Rod Fire Starter
$49.99
Choosing a Ferro Rod: What You Should Know
Ferro Rods are not created equal. Because ferrocerium is a synthetic blend of a few different elements, the composition can vary significantly between manufacturers. This can make it tough to know what you’re buying, especially if its from an unknown brand.
While most ferro rods are cheap enough that it doesn’t really matter to some people – we think its worth knowing what to look for; and worth choosing the one that will make establishing camp just that little bit easier in the wilderness.
It is a tool, after all. And it’s a tool that you may come to rely on in a survival situation, so it pays to get it right.
For those who are new to ferro rods, they work by removing the ferrocerium material with a scraping/striking action. This action creates a burning spark due to ferrocerium’s low ignition temperature (around 150–180 °C). These molten sparks will continue to burn for a short period of time, igniting your tinder material. Ferrocerium will do this regardless of temperature, humidity, or altitude – making it an extremely versatile and reliable firestarting method.
Things to Consider
1. Hardness
This is where you will find the largest variance between brands, and its also amongst the most important factors to consider when buying a ferro rod.
Unfortunately most brands will leave this key bit of info out, making it tough to know what you’re actually buying. If the manufacturer gives an indication of hardness, you’ll know what you’re getting, and can then get the rod that best suits your preference.
Hardness will affect several things:
- Burn Temp: Generally a harder composition will burn hotter. A softer composition requires less energy to remove material, and will therefore burn colder. Keep in mind that we’re talking thousands of degrees here, so a little variance in temperature isn’t a deal-breaker.
- Spark size: Harder ferro rods will throw smaller, lighter sparks that burn out quicker. Softer ferro rods will produce larger, heavier sparks that burn for longer.
- Longevity: Typically the harder the ferrocerium, the longer the rod will last. You’re removing less material with each strike, naturally this means you’ll get more strikes out of a rod.
- Usability: Harder = more effort to strike. Softer = less effort to strike.
You should be starting to get an idea on how these factors work together now.
A ferro rod with high hardness will produce a hotter spark and last longer before wearing out, but it will require more effort to strike and become much more difficult to start a fire with. That’s not ideal in an emergency situation.
A softer composition is much easier to ignite, and throws a larger, longer burning spark. But it will wear out faster. This is fine for occasional use, or as a back up emergency firestarter. But less than ideal when practicing, or for regular use.
When testing compositions for the FURNACE Ferro Rod, we aimed for the best of both worlds. A composition that balanced ease-of-use with durability. We refer to it as Easy-Spark™, and it delivers some real consistency in the world of ferro rods.
Pro tip: In theory, most rods will be good for tens of thousands of strikes before wearing down to nothing. Whilst strike counts will give you a good indication of hardness, its important to remember it also depends on the thickness of the rod (no joke intended). Plus, you’ll likely lose your ferro rod before it ever wears out. Trust us, we’ve been through a few!

2. Size
Two things come into play here… thickness and length.
Thickness: When you’re shopping for a ferro rod, aim for one with some good girth on it. Around 10mm is a good balance between weight, ease-of-use, and longevity. Thinner rods have a shorter effective lifespan, are harder to use, and put off less sparks.
If your intention is to keep your ferro rod as a back-up/emergency firestarting tool, an 8mm rod will be fine. Just make sure she’s a good quality one so you’re not stuck without a reliable fire starting method.
Length: Short enough to not be a hassle, long enough to get a good stroke on it. Remember, the more material you can remove in one go, the more sparks, the more heat, and the more reliable your ferro rod will be. Shorter rods are great for lighting gas stoves as you only need a small spark. Longer rods are better for starting a wood fire with tinder as you need that concentrated heat.
Pro-tip: Ferro rods vary greatly in thickness. Use whatever is comfortable for you, but remember that ferrocerium is a heavy material and a larger rod has a poor weight/benefit ratio in your pack.
3. Comfort
A good ferro rod has an ergonomic handle and plenty of grip. We opted for wood on ours as it provides a sturdy grip, doesn’t get cold like metal does, and has a much nicer feel than plastic.
Most of the comfort will come down to personal preference, but aim for a rod thats easy to both hold and use with cold hands or gloves.
A good grip will improve control and reduce the chance of you destroying your carefully arranged tinder pile.
4. Striker
A good striker makes all the difference. The key things to look for here are:
- Sharp 90-degree edge
- hard striker material (carbon steel works well)
- holding comfort + grip
The striker plays a massive role in the reliability and quality of your spark. A sharper and harder corner will strip that ferrocerium away with ease and produce large hot sparks. A comfortable hold on the striker will deliver control, allowing you to perfectly place those sparks right where you need them.
Pro-tip: It’s common to use the spine of a knife as a striker. You can also make your own out of steel, or use the one that comes with the rod. Our ferro rods come with an included striker that removes a good amount of material and produce reliable sparks, but feel free to use whatever is comfortable for your hands.
Summary
Ferro rods are an awesome and essential bit of gear for anybody who regularly ventures into the outdoors. While they do take some practice to use effectively, you simply can’t beat the reliability and longevity that a quality ferro rod provides. When you’re shopping around, these above tips will help you to choose the right tool for the job.
We’ve done the hard-yards in testing and comparing different compositions so you don’t have to. Shop Falko ferro rods here and establish your next camp with full confidence.
Ferro Rod Fire Starter
$49.99
Gear Tips: Why Beeswax Is Essential In Your Outdoor Kit
When it comes to weatherproofing and preserving your outdoor gear, beeswax is well known to be a natural and effective solution. Beyond its role in honey production, beeswax has been a trusted ally in the world of outdoor gear care for centuries.
As you know, here at Falko, we’re pretty big fans of natural materials that are suitable for a range of applications. Be it wood, canvas, or steel, these classic materials help to create items that look beautiful and last a life-time. Beeswax is one of these materials, so this little article is written in tribute to this fantastic multi-use resource.

Why Beeswax?
1. Protection from Moisture
Waxes excel at forming a protective barrier against moisture, and once it goes on, it can be difficult to remove – ideal for gear that gets a thrashing outdoors. Whether it’s your favourite jacket or a pair of leather boots, a coating of beeswax helps keep the water out, ensuring your gear stays dry and ready for the unpredictable.
Pro tip: we use beeswax on our high-carbon steel axes and tools to help repel moisture too.

2. Preserving the Fibers
Outdoor gear takes a beating, but beeswax is an ideal way to extend the lifetime of natural fibers. Applying a thin layer to your cotton canvas bags not only repels water but also nourishes the fibers, extending the life of your gear, keeping it supple, and in top-notch condition.
3. It’s Eco-Friendly & Sustainable.
We value sustainability, and beeswax fits the bill. It’s a by-product of the honey industry and can be sourced responsibly from bees as they build their hives, making it a renewable resource. Its extraction is eco-friendly and does not require chemicals or solvents to process, meaning it aligns perfectly with our commitment to building outdoor gear that has minimal effect on the environment.
4. Versatile Application
The beauty of beeswax lies in its versatility. Whether you’re reviving a waxed canvas jacket, protecting leather boots, or conditioning wooden tool handles, beeswax gets the job done.
Our BushWax Puck, crafted with a blend of New Zealand Beeswax and other natural waxes, is a testament to the practicality of this natural solution.
Summary
In the realm of outdoor gear care, beeswax really can’t be beat. It’s simple, effective, environmentally friendly, and ensures your gear stands strong against the elements. We don’t like to use the word miracle lightly, but beeswax really is a miracle material.